 |
| It can be found on page 100 of The Complete Guide to Vegan Food Substitutions. |

Thursday, May 31, 2012
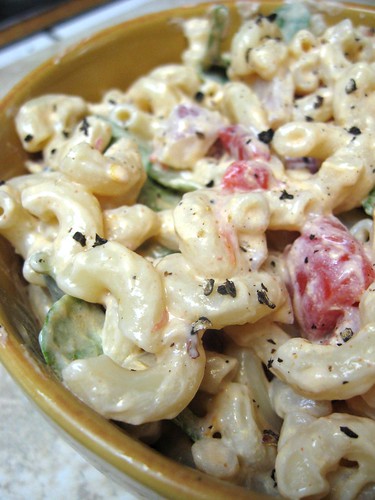
Easy Breezy Summer Afternoons (are perfect for mac salad!)

Saturday, May 19, 2012
And the winners are...
#30 and #40!
#30

#40

Congratulations Charj and Melinda! Please send me an email (to joni AT justthefood DOT com) with your mailing address so that I can send you your book!
My nephew, Dominic, is spending the weekend with us, and he randomly chose the numbers.
This is Dominic.

#30

#40

Congratulations Charj and Melinda! Please send me an email (to joni AT justthefood DOT com) with your mailing address so that I can send you your book!
My nephew, Dominic, is spending the weekend with us, and he randomly chose the numbers.
This is Dominic.

Saturday, May 12, 2012
Dust off those BBQ grills! (and a giveaway!)
We are dangerously close to summer, and nothing says summer like cooking outdoors on the grill. And what better to cook on the grill then....you guessed it....veggie burgers! While companies like Gardein and Wildwood have taken amazing strides forward in making a great premade veggie patties that taste good unlike their former hockey-puck-like predecessors, there's still nothing quite like a home made veggie burger.
I thought I'd kick off this grillin' season with a veggie burger that celebrates veggies in all of their glory! You know, contrary to the belief of some of the reviewers over on Amazon, my book, The Best Veggie Burgers on the Planet includes many burgers that are soy free, wheat free, and some that are even wheat and soy free. The recipe below is soy free. And in addition to the recipe below, I am giving away 2 signed copies of The Best Veggie Burgers on the Planet.Just leave a comment in the blog comments telling me your favorite meal to prepare on the grill and I will choose 2 random winners on Friday, May 18 at 6 pm PST. (Yes, I will ship internationally!) THIS CONTEST IS NOW OVER THE WINNERS ARE #30 CHARJ AND #40 MALINDA. STAY TUNED FOR ANOTHER GIVEAWAY SOON.
3 cups (705 ml) vegetable broth
8 ounces (227 g) mushrooms, sliced or chopped
1 onion, diced
1 cup (108 g) shredded carrots
2 teaspoons (10 g) minced garlic
1 cup (190 g) uncooked brown rice
1 cup (134 g) 1/2-inch (1.3 cm) pieces asparagus spears
2 cups (60 g) chiffonaded spinach leaves
2 tablespoons (8 g) chopped fresh dill
1 cup (80 g) uncooked oats
1/2 cup (65 g) ground cashews
1 cup (120 g) whole wheat flour
1/2 cup (72 g) vital wheat gluten flour
Salt and pepper
Oil, for frying (optional)
To a large pot, add the vegetable broth, mushrooms, onion, carrots, and garlic. Bring to a boil. Lower the heat to a simmer and stir in the rice. Cover and simmer for about 20 minutes, or until the rice is fully cooked.
I thought I'd kick off this grillin' season with a veggie burger that celebrates veggies in all of their glory! You know, contrary to the belief of some of the reviewers over on Amazon, my book, The Best Veggie Burgers on the Planet includes many burgers that are soy free, wheat free, and some that are even wheat and soy free. The recipe below is soy free. And in addition to the recipe below, I am giving away 2 signed copies of The Best Veggie Burgers on the Planet.
 |
| Mushroom, Asparagus and Spinach Burger on a whole wheat bun with spinach, avocado and Vegenaise. |
Mushroom, Asparagus, and Spinach Burger
This recipe is a good one to make ahead of time and follow the directions all the way through the baking step. Then freeze them in between layers of parchment. Whenever you want a burger, pop one out of the freezer and pan fry or grill until heated all the way through.
Serving
Suggestion: Chock-full of veggies, this one doesn’t need much. Place on a nice
wheat bun with some crispy greens, some slices of ripe avocado, maybe a schmear of vegan mayo, and you’re good
to go.
3 cups (705 ml) vegetable broth
8 ounces (227 g) mushrooms, sliced or chopped
1 onion, diced
1 cup (108 g) shredded carrots
2 teaspoons (10 g) minced garlic
1 cup (190 g) uncooked brown rice
1 cup (134 g) 1/2-inch (1.3 cm) pieces asparagus spears
2 cups (60 g) chiffonaded spinach leaves
2 tablespoons (8 g) chopped fresh dill
1 cup (80 g) uncooked oats
1/2 cup (65 g) ground cashews
1 cup (120 g) whole wheat flour
1/2 cup (72 g) vital wheat gluten flour
Salt and pepper
Oil, for frying (optional)
To a large pot, add the vegetable broth, mushrooms, onion, carrots, and garlic. Bring to a boil. Lower the heat to a simmer and stir in the rice. Cover and simmer for about 20 minutes, or until the rice is fully cooked.
Uncover and stir in the asparagus,
spinach, and dill. Continue to cook, uncovered, until most of the moisture has
been absorbed.
Remove from the heat, stir in the oats,
cover, and let sit for 10 minutes.
Mix in the cashews, whole wheat
flour, gluten flour, and salt and pepper to taste. Mix very well until all
ingredients are well incorporated. Use your hands if necessary. Cover and
refrigerate for at least 20 minutes to thicken up a bit.
Meanwhile, preheat the oven to 350°F
(180°C, or gas mark 4). Line a baking sheet with parchment paper or a silicone
baking mat.
Form into 10 patties, place on
the prepared baking sheet, and bake for 20 minutes, until firm and warmed all the way through.
If desired, you can fry or grill these after baking, to give them a nice crispy crust.
Yield: 10 patties
(Nutritional info does not include the optional oil for frying.)

(Nutritional info does not include the optional oil for frying.)
Friday, April 6, 2012
Easter Eggs!
 |
| (This was originally posted in 2010 and is included in 500 Vegan Recipes. ) |
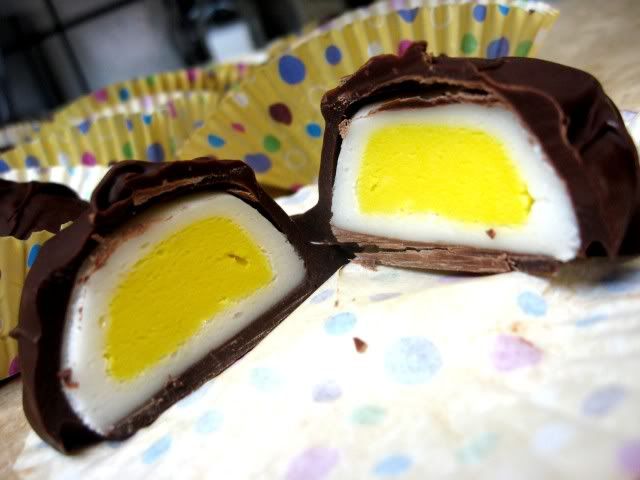
Cruelty free Easter eggs! These are fun if you have little ones or even for yourself. They are slightly reminiscent of those Cadbury ones, but the filling is not nearly as runny.
These also make a mean peppermint patty, so you don't have to wait until Easter to enjoy them! As a matter of fact, you can sub any flavor into the center and make a variety of chocolates.
1/2 cup light corn syrup (or clear agave)
1 tablespoon pure vanilla extract
3 cups powdered sugar
A few drops yellow food coloring (or a it of turmeric!) optional
Extra powdered sugar for dusting
12 ounces vegan chocolate chips
In a bowl, mix together corn syrup and vanilla. Begin adding in sugar one cup at a time. Work in the sugar until you get a dough that is the consistency of play-dough.
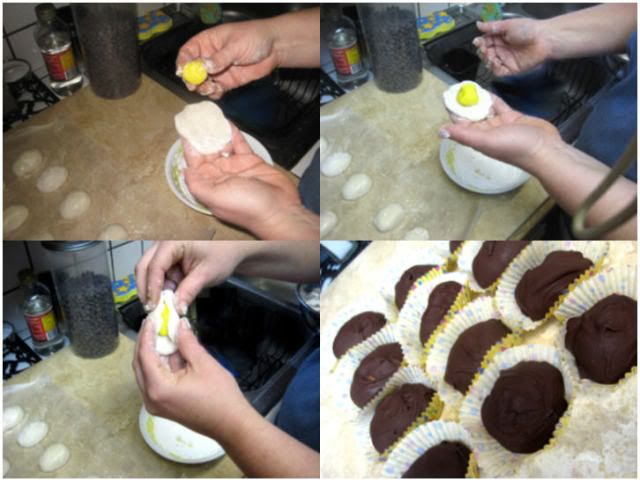
Divide into thirds. Add yellow food coloring to 1/3 of the dough. Divide that 1/3 into 12 even pieces and roll into small balls. Dust with extra powdered sugar as you work to prevent them from getting too sticky. Place on a sheet of parchment or wax paper and set aside.
Divide the remaining 2/3 into 12 equal pieces and form into small patties. Once again dusting with powdered sugar as you work.
Add one "yolk" into the center of each patty and wrap the patty around it. Form into an egg shape, Dusting as you work. Place on parchment or waxed paper and place in the freezer to stiffen up before you dip them in the chocolate, about an hour or so.
While your "eggs" are freezing, you can melt your chocolate, either on a double boiler or in the microwave.
Dip each egg in chocolate and return to wax paper to cool and harden. You can place them back in the freezer to speed up the process if you'd like.
Yield: A dozen "eggs"
Variations:
Peppermint Patties: Instead of dividing into thirds, add 2 tablespoons (30 ml) of peppermint extract to the corn syrup and vanilla before adding the sugar. Divide into 24 equal pieces and form into patties. Follow the recipe from there.
Lemon or Orange Candies: Get creative with the flavors! Add 2 tablespoons (30 ml) of lemon or orange (or almond or anise or cinnamon...) extract instead of the peppermint. Add a touch of yellow or orange food color, or whatever color matches the flavor you use to make a variety.
All natural food colors can be made using a variety of ingredients...my favorites are turmeric (yellow), beet juice or powder (pink), tomato powder (orange), and spinach juice or powder (green), or you can buy all natural food colors from India Tree.
Wednesday, March 28, 2012
Vegan Bake Sale
  |
| (click on image to enlarge) |
This year I decided that I need to represent here in the OC. The owner of the Trabuco Canyon Country Store is graciously allowing us to set up outside and I am confident that the animal loving folks out here in the canyon are going to buy us out in no time! Join us! Either as a baker, seller, or buyer!
Date:
April 28, 2012
Time:
10 am until we're sold out!
Location:
The Trabuco Canyon Country Store
31021 Trabuco Canyon Road
Trabuco Canyon, CA 92679
100% of the proceeds go to benefit
Barks of Love, Orange County.
Tuesday, March 27, 2012
Boogity, Boogity, Boogity!
Yes, I spent the entire weekend in Fontana at the Auto Club Speedway watching the NASCAR races. The Royal Purple 300 on Saturday and the Auto Club 400 on Sunday. I've been a few times in the past, but this last year we (my husband and I) got really into it and decided to really make a weekend out of it. So this year we prepared. I remember from last year, when all we did was bring ourselves, that there is not much besides french fries and alcohol for us vegans. This year we made sure there was plenty to eat.
Friday night we prepared everything for the weekend. I made up a big batch of macaroni salad, a bunch of Soyrizo and tofu scramble breakfast burritos, and then we packed up some veggie dogs, buns, condiments, crackers, sodas, waters, and of course, some booze! We had everything we needed to get our tailgate on in the parking lot!
 |
| Dan and I enjoying our veg friendly eats on the tailgate. |
Friday night we prepared everything for the weekend. I made up a big batch of macaroni salad, a bunch of Soyrizo and tofu scramble breakfast burritos, and then we packed up some veggie dogs, buns, condiments, crackers, sodas, waters, and of course, some booze! We had everything we needed to get our tailgate on in the parking lot!
Thursday, March 1, 2012
Kurt Halsey + Celine Steen + Joni Marie Newman = AWESOME!
What is this crazy collab-o I speak of? Vegan Food Gifts: Spread the Vegan Love DIY-Style with 100 Inspired Recipes for Homemade Edible Gifts, Baked Goods, Preserves, and More Written by Joni Marie Newman with photos by Celine Steen and illustrations by Kurt Halsey. A vegan triple threat of epic DIY proportions, if you ask me.
Now available for pre-order on Amazon with a tentative release date of September of this year.
To give you a little sneak peak of what's in store check out this recipe for infused Gin which will be included in the chapter appropriately titled: Last Call

GIN-ger Snap
10 slices (2.5 ounces, or 70 g) fresh ginger (skin on is fine)
Now available for pre-order on Amazon with a tentative release date of September of this year.
To give you a little sneak peak of what's in store check out this recipe for infused Gin which will be included in the chapter appropriately titled: Last Call

GIN-ger Snap
This stuff is no joke. It's made with Gin and
definitely has a snap!
10 slices (2.5 ounces, or 70 g) fresh ginger (skin on is fine)
2 cinnamon sticks
1 teaspoon dried orange peel
4 cups (940 ml) gin
Add ginger, cinnamon sticks, and orange
peel to the bottom of a container with a tight fitting lid.
Pour gin into container, seal, give
it a good shake, and let sit for one full week shaking once daily.
Strain out solids (I like to leave
in the cinnamon sticks) and pour into bottles or jars with tight fitting lids
Yield: 4 cups (940 ml)
GIFT IT!
Package in pretty bottles or mason jars affix a label to the bottle, and attach the recipe card below.
 |
| CLICK ON IMAGE TO ENLARGE! |
Thursday, February 2, 2012
A Simple Lunch with Home Made Spicy Pickles

It's true. Sometimes I enjoy a good Tofurkey sandwich. This particular sandwich is full of store bought, easy, convenience foods: Vegenaise, SmartBacon, Sourdough grilled with Earth Balance, and pre-washed bagged baby spinach. Why? Because I don't always have time to make all of my food from scratch. I mean geez, a girl has to go to work, write cookbooks, play with the dogs, do a little laundry every now and again, and still find time to have a life with the husband! But even when I throw together a convenient meal, I do like to have at least one aspect of it be home made. In this case it was the pickles!
These pickles are a recipe from my upcoming book, Vegan Food Gifts: Spread the Vegan Love DIY-Style with 100 Inspired Recipes for Homemade Edible Gifts, Baked Goods, Preserves, and More
Spicy Garlic Dill Pickles
This recipe is so simple, you'll have your pickles all jarred up in about the time it takes to boil the water and slice the cucumbers. I wrote this recipe so that you could make 1 jar or 10 jars!
For the brine:
For each cup of water, use 1 tablespoon of fine sea salt
For each (16 ounce) jar of pickles you will need the following:
1 sterilized jar, with lid and ring
1 tablespoon black peppercorns
1 teaspoon whole mustard seeds
1 to 2 cucumbers, cut in desired shapes to fit in your jar
4 garlic cloves, cut in half
1 bay leaf, broken into pieces
1 tablespoon fresh dill
Brine to fill the jar
Bring water and salt to boil. Boil until all salt is dissolved. Reduce to low, and simmer until ready to pour.
In a very dry pan, lightly toast the peppercorns and mustard seeds. Set aside.
Add cucumbers to jar.
Add garlic, bay leaf, dill, chile flakes, toasted peppercorns, and mustard seeds to the jar.
Pour hot brine to fill the jars, allowing 1/2-inch of space at the top.
Place lids and rings on the jars, and give it a good shake to distribute all of the ingredients.
Place upright and allow to cool. The lids should self seal as the brine cools creating a vacuum in the jars. Place in a cool dark place for 1 week, before gifting/opening.
MAKE IT A GIFT
Attach a handwritten label or tie on a gift tag with a piece of twine. Make sure it's known that these are special hand made pickles, that you made with love! Also make a note to keep refrigerated.
REMEMBER: These pickles should be refrigerated after the one week of fermenting, even if you don't open them right away.
Thursday, December 15, 2011
What? Christmas is Next Weekend?
Whoa. I better get my rear in gear. And for me that means many, many treats for neighbors, friends, coworkers, and family. With not much time left, I am going to have to call upon some ghosts of Christmas past to help me along in the idea department. I mean there is no reason to reinvent the sleigh wheel right?
Let me begin by admitting, I am not a real big fan of baking. I know, I know, chastise me if you must, but I really enjoy making other types of treats way more than cookies, pies, and (shutter) cupcakes. So candies have always been my bag at Christmas time. Sure, I will break down and whip up a few batches of sugar cookies cut out into stars and trees, decorated with green and pink (still can't get a perfect vegan red icing!) sprinkles. I may even bake up some of my Espresso Chocolate Chip Cakes that I usually reserve for Valentine's Day.
Back to candies. The majority of my bags, baskets, boxes and platters will be filled with Kittee's Peanut Butter Fudge, Peppermint Candy Cane Bark, Microwave Peanut Brittle, and Mashed Potato Candy.
This year I am going to add a new member to the family. For a select, very special few, I will make this very special treat. I have posted pictures of this delicious candy in the past, but not until now have I posted the recipe. It comes straight from the pages of The Complete Guide to Vegan Food Substitutions and appears on page 162. It is reminiscent of that old fashioned candy known as Honeycomb Candy. The texture is crumbly and sticky, and when dipped in bittersweet chocolate, it is just delicious.
Maple Sponge Candy
This candy is a molasses-y twist on old fashioned honeycomb candy. Crispy and sweet (and possibly coated in chocolate.) Not for the novice, it requires patience and an accurate candy thermometer. Don’t let the simple ingredients fool you. This candy is pure science!
2 cups (384 g) Sucanat
1/2 cup (120 ml) pure maple syrup
1/2 cup (120 ml) water
1 tablespoon baking soda
Melted chocolate for dipping (optional)

Let me begin by admitting, I am not a real big fan of baking. I know, I know, chastise me if you must, but I really enjoy making other types of treats way more than cookies, pies, and (shutter) cupcakes. So candies have always been my bag at Christmas time. Sure, I will break down and whip up a few batches of sugar cookies cut out into stars and trees, decorated with green and pink (still can't get a perfect vegan red icing!) sprinkles. I may even bake up some of my Espresso Chocolate Chip Cakes that I usually reserve for Valentine's Day.
Back to candies. The majority of my bags, baskets, boxes and platters will be filled with Kittee's Peanut Butter Fudge, Peppermint Candy Cane Bark, Microwave Peanut Brittle, and Mashed Potato Candy.
This year I am going to add a new member to the family. For a select, very special few, I will make this very special treat. I have posted pictures of this delicious candy in the past, but not until now have I posted the recipe. It comes straight from the pages of The Complete Guide to Vegan Food Substitutions and appears on page 162. It is reminiscent of that old fashioned candy known as Honeycomb Candy. The texture is crumbly and sticky, and when dipped in bittersweet chocolate, it is just delicious.
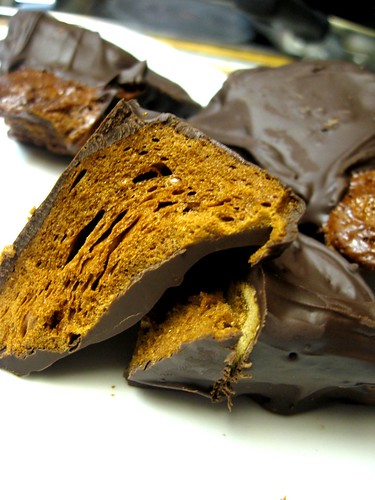 |
| Maple Sponge Candy (page 162 in The Complete Guide to Vegan Food Substitutions) |
Maple Sponge Candy
This candy is a molasses-y twist on old fashioned honeycomb candy. Crispy and sweet (and possibly coated in chocolate.) Not for the novice, it requires patience and an accurate candy thermometer. Don’t let the simple ingredients fool you. This candy is pure science!
2 cups (384 g) Sucanat
1/2 cup (120 ml) pure maple syrup
1/2 cup (120 ml) water
1 tablespoon baking soda
Melted chocolate for dipping (optional)
Prepare a 9×13-inch (23 x 33-cm) baking dish by lining it with foil and then sprating the foil with nonstick cooking spray.
In a large soup pot, place the Sucanat, maple syrup, and water.
Heat on low, constantly stirring until Sucanat is completely dissolved.
Raise heat and bring to a boil, watch temperature carefully. Bring the temperature to 250˚ F (121˚ C) and maintain that temperature constantly for ten minutes.
Remove from heat and quickly, but thoroughly, stir in the baking soda.
The mixture will begin to bubble and froth.
Immediately pour the mixture into the prepared foil lined dish.
Allow to cool completely before removing from pan and breaking into pieces.
Dip in melted chocolate if using. Allow to cool completely before storing.
Store in an airtight container for up to one week.
In a large soup pot, place the Sucanat, maple syrup, and water.
Heat on low, constantly stirring until Sucanat is completely dissolved.
Raise heat and bring to a boil, watch temperature carefully. Bring the temperature to 250˚ F (121˚ C) and maintain that temperature constantly for ten minutes.
Remove from heat and quickly, but thoroughly, stir in the baking soda.
The mixture will begin to bubble and froth.
Immediately pour the mixture into the prepared foil lined dish.
Allow to cool completely before removing from pan and breaking into pieces.
Dip in melted chocolate if using. Allow to cool completely before storing.
Store in an airtight container for up to one week.
Yield: 1 batch, about 30 pieces
Friday, December 9, 2011
Friends, food, books, products, all vegan, and I can find it all in one place?
Now that is a website I can use! Vegan Corner just launched this week, and I have already been poking around over there several times a day. And you know what? Every time I do, it gets better. And I can only imagine it will continue to get better and better each and every day. Why? Because some pretty cool vegans are runnin' that show.

I had the pleasure of meeting Adriana (one of the founders of Vegan Corner) a few years back when she showed up at one of my cooking demos at Whole Foods in Long Beach. We chatted for a bit about this and that, and she gave me her Facebook name so we could be "friends." We did, and not much else exciting happened between the two of us.
Flash forward to the glorious summer of 2011. The summer of vegan love. The inaugural Vida Vegan Conference in Portland, Oregon. Amongst the crowd, I saw a pretty gal that looked familiar..."Adriana? Is that you?" Silly that we finally met up again in another state when we only live an hours drive from each other. Nonetheless, there we were, two SoCal gals in wonderful PDX, with a yearning to go goth dancing. So goth dancing we did (along with June, Terry Hope Romero and Erika) but I digress...
Anyhow, Adriana was there to promote Vegan Corner, and what an awesome job she did. I have been waiting eagerly to see it go live ever since. And now it's here! It's, like, the best Christmas present eva! So, if you want to give yourself a present, click on over to Vegan Corner and check it out, join the forums, read and leave reviews of your favorite vegan stuff, and help to make it a even more bad ass site than it already is!

I had the pleasure of meeting Adriana (one of the founders of Vegan Corner) a few years back when she showed up at one of my cooking demos at Whole Foods in Long Beach. We chatted for a bit about this and that, and she gave me her Facebook name so we could be "friends." We did, and not much else exciting happened between the two of us.
Flash forward to the glorious summer of 2011. The summer of vegan love. The inaugural Vida Vegan Conference in Portland, Oregon. Amongst the crowd, I saw a pretty gal that looked familiar..."Adriana? Is that you?" Silly that we finally met up again in another state when we only live an hours drive from each other. Nonetheless, there we were, two SoCal gals in wonderful PDX, with a yearning to go goth dancing. So goth dancing we did (along with June, Terry Hope Romero and Erika) but I digress...
Anyhow, Adriana was there to promote Vegan Corner, and what an awesome job she did. I have been waiting eagerly to see it go live ever since. And now it's here! It's, like, the best Christmas present eva! So, if you want to give yourself a present, click on over to Vegan Corner and check it out, join the forums, read and leave reviews of your favorite vegan stuff, and help to make it a even more bad ass site than it already is!
Subscribe to:
Posts (Atom)