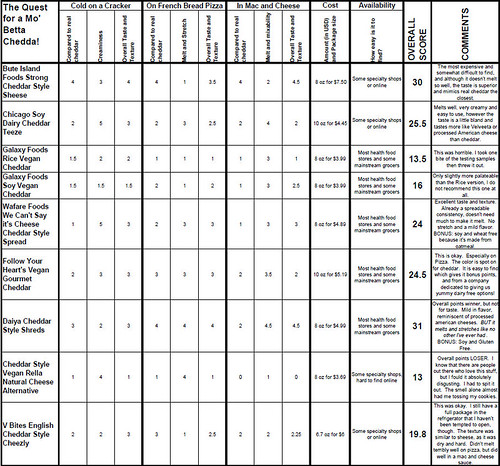
Less than a week until Christmas!?! Oh my gosh. I am not even halfway there...not even a quarter way there.
So before I get all caught up in the rush of it all, let me give my present to you...a new recipe featuring my favorite tuber, the sweet potato!
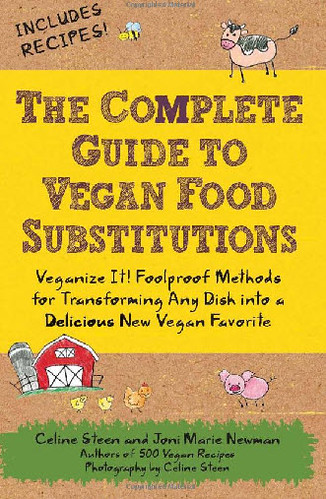
And if you leave a comment (here on the blog, not on facebook or twitter) telling me your favorite way to prepare sweet potatoes, I will pick 2 of you at random, Wednesday night at 8pm, Due to weather related issues, the giveaway has been extended, and I will do the drawing on Wednesday December 29 at 8pm, to receive a copy of Celine and my brand spankin' new book The Complete Guide to Vegan Food Substitutions
. CONTEST NOW OVER
Okay, to the food:
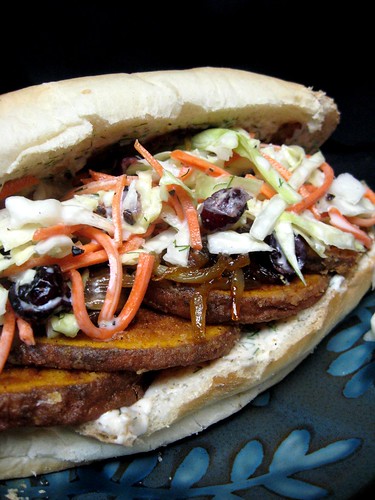 Sweet Potato Po'Boys
If I ever opened a lunch truck or diner, it would be made up solely of gourmet sandwiches and a variety of macaroni salads. This sandwich would definitely be on the menu. Not a traditional Po’ Boy by any sense of the word, it is inspired by the fried seafood sandwiches made famous in Louisiana. Now a true Po’ Boy would be a foot long, so these ones are considered “shorties” and if you decide to use the highly recommended pile of
Sweet Peppercorn Coleslaw, well then you can consider your Po’ Boy “dressed.”
As always, a deep fryer works best here, but if you don’t have one, a pot filled with about 1 inch (2.5 cm) of oil will work just fine.
For the Sweet Potatoes:
1 large sweet potato
1/2 cup (120 ml) plain soymilk or other nondairy milk
1/2 cup (62 g) all-purpose flour
1/2 cup (14 g) cornflakes, crushed
1 teaspoon Old Bay seasoning
1/4 teaspoon cayenne pepper
For the Fennel Marmalade:
2 tablespoons (30 ml) olive oil
1 bulb fennel, sliced in a thin julienne (reserve the leaves for later use)
2 cloves garlic, thinly sliced
2 shallots, thinly sliced
pinch salt
2 tablespoons (42 g) agave nectar
For the Aioli:
1/3 cup (75 g) vegan mayonnaise
1/2 teaspoon Old Bay seasoning
1 tablespoon (2 g) chopped fennel leaves (reserved from the bulb above)
1 teaspoon minced garlic
Vegetable oil for frying
4 (6-inch, 15 cm) french rolls
1 recipe Sweet Peppercorn Coleslaw, below, optional, but highly reccommended
Preheat your oven to 400°F (200°C, or gas mark 6).
To make the sweet potatoes: Slice the sweet potato into thin rounds, about 1/4 inch (6 mm) thick. You can peel your potatoes if you choose, but we like ours with the skin on!
Place the potatoes in a single layer on a baking sheet lined with parchment or a silicone baking mat.
Bake for 20 minutes. Remove from oven and allow to cool.
To make the Fennel Marmalade: While potatoes are cooking, add olive oil to a pan and heat over low heat. Add fennel, garlic, shallots, and a pinch of salt.
Slowly cook until very soft and tender, and just beginning to caramelize, About 15 minutes, stirring occasionaly.
Add in agave and toss to coat. Crank up the heat and cook about 5 more minutes, stirring constantly, until caramelized, sticky, and browned. Remove from heat and set aside.
To make the aioli: Whisk ingredients together. Keep refrigerated until ready to use.
Finish the sweet potatoes: Preheat your oil to 350°F (180°C). Place milk in a shallow dish. Add flour, cornflakes, Old Bay, and cayenne to a resealable plastic bag and shake to combine. Dip one round into the milk to coat and then add it to the bag. Repeat until you have about 5 rounds in the bag. Shake to coat the potatoes with the flour mixture. Carefully add to the coated potatoes to the hot oil and cook for about 2 to 3 minutes, flipping half way through, until golden and crispy. Transfer to a plate lined with paper towels to absorb excess oil. Repeat until all potatoes are fried.
Assemble the Po’ Boys: Spread a layer of aioli on each half of the french roll. Pile 1/4 of the sweet potatoes on the bottom half of the roll, and top with 1/4 of the Fennel Marmalade, add a heaping pile of the Sweet Peppercorn Coleslaw, if using. Serve immediately.
Yield: 4 Po’ Boys
Sweet Peppercorn Coleslaw
*Gluten Free
*Quick and Easy
This coleslaw is a great side dish on it’s own, but it really takes the Sweet Potato Po’ Boys to a whole new level. You can make this ahead of time, but if you do, keep the dressing separate and toss together just before serving.
For the slaw:
1/2 head of green cabbage, shredded
1 1/2 cups (162 g) shredded carrots
1/2 cup (80 g) raisins or dried cranberries, optional
For the peppercorn dressing:
1/2 cup (120 ml) plain soymilk
2 tablespoons (30 ml) lemon juice
1/2 cup (112 g) vegan mayonnaise
1 tablespoon black peppercorns, coursely ground or cracked
1 tablespoon (2 g) fresh chopped fennel leaf
1 tablespoon (13 g) sugar
salt to taste
To make the slaw: Toss together the ingredients in a large mixing bowl.
To make the dressing: Add soymilk to a small mixing bowl. Stir in lemon juice and allow to sit for a few minutes. It will curdle and become like buttermilk.
Whisk in the remaining ingredients.
Toss dressing with the slaw and serve immediately.
Yield: 8 servings